For today's Tutorial Thursday I am going to be showing you more of PicMonkey, a fun browser site, that allows you to do some quick editing, without having to download anything onto your computer.
I did Part 1 a few weeks back, so if you aren't use to the site, please read on through the first part HERE.

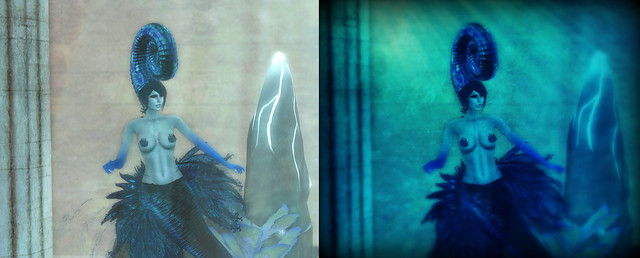
With Fantasy Gacha Carnival just opening, and Enchantment opening tomorrow, I will be doing a lot of underwater shots, as these events have a lot of Mer related items. I did this underwater picture the other day, and thought it might be a good secondary tutorial for PicMonkey, to follow up the previous one.
I don't play around with my blog shots too often, I am not that sort of blogger. I only have so much time between all of what I do in a sl, so I have always just taken the best inworld environmental shots I can.
One thing tho, is it is not exactly easy to take pictures the sl waters, and make them look like they are really underwater. Not unless the sim has some special decorations, like Light Beams or Ripple Emitters.
PicMonkey can help you with this, in a quick simple way. The above shots was edited in PicMonkey, the Left being the inworld shot, the Right being my edited in PicMonkey shot.
This tutorial will continue after the break, for the sake of the feeds that Free*Style is published on.
.
If you are still interested, please click on through.
If you are still interested, please click on through.
.
Please click on the photos when
needed to enlarge the shots. This will help you better understand what
is going on during each part of the tutorial.
.
.
Since the above shot was already edited, and I only had the thought to do the tutorial after I had it done, I will be using the shot below, for the tutorial today.

I will be continuing the tutorial as if you have done the first, and are familiar with the placement of all the PicMonkey Tools that we will be using.
.
First, load up PicMonkey on your Browser and load your picture into the Edit Window.
.
Second, you will want to be in the Basic Edits menu so you can use Crop to resize your photo to your liking. I don't want that glowy bit in my end picture, so I am just going to lop that off.

Then we are going to the Effects menu.
.
Cross Process is a good one to use for underwater pictures. There is 3 colour options, Green, Blue and Red. The Blue adds to your inworld shot, if your shot was more crisp. The Green is good if your shot is a bit murkier. I have never needed to use the Red for underwater shots, but who knows, you might want to experiment with it.
.
I set the Fade to 40% for mine, but just play with it, and then apply it when you get the results you want.

I then use Orton, with Bloom at 40%, Brightness at 20% and Fade at 40%. These numbers are just an example, it really does depend on the colouring of your own picture, so move the levels around, then apply when you are satisfied.

Now, this is where we break from the last tutorial, and do something different. We are going to go down to the Textures menu, which looks like this:

There are 6 preloaded Water textures. I normally mix a few on each photo I am working on. The Top Middle one I like to use most, it has the light beams, and makes some ripples on your surface water, if it is in the shot. If you don't have any surface showing, but still like the beams, you can resize the texture, and then move it around. All the options are in the same menu, for manipulating the texture.

I like to layer these Water textures, so here I added another, made it larger, moved it, and fiddled with the numbers.

Comparison

Now I could be done, but there are always certain things I like doing with my shots in general, when using PicMonkey. I like to ad a bit of FoD(Field of View), much like what you would get using the same setting inworld. You can get this by using the Focal Soften, which you will find in the Effects menu.
Just play with the numbers, until you get something you like. If an avi was in my shot, I would make sure they were the focus, and spread the circle larger, depending on what else was going on in the shot. I just made the one archway entrance the focus for this shot.
I also like a bit of black bordering, as I have darker, more gloomy tastes. So I use Dark Edges, and fiddle with the settings until I am happy.

Either of these are fine really. I like the extra steps, but as you can see, the one on the left, which is without the Focal Soften and Dark Edges, looks just fine.

You can see just how much this quick 5 minute edit, made an inworld underwater shot go from being bland to actually looking like a shark might pop by at any moment.
I hope you find this tutorial useful, an get out and explore some of the great underwater sims of SL.
I took my shot at Pasifique, which is a sim that welcomes the public.

Full End Shot
I hope you enjoy Picmonkey!